
Welcome to part two of our guide, which covers Chia plotting in Linux. The Chia plotting landscape has changed quite a bit with the Mad Max plotter launch. We have a separate guide covering the differences between the official and Mad Max Chia plotter, and we highly recommend you take a look at it.
If you haven’t read Part One of this guide, we cover the basics of Installing the Chia client on Linux and setting up a new or existing wallet. The Chia client must plot with the traditional plotter, even with a manager like Plotman, so you should give it a read.
However, the Mad Max plotter doesn’t require you to set up the CLI on your plotting system. In this case, you can continue with this guide if you have already set up a wallet on another system.
Step 01: Mounting Drives
If you’ve just set up your Linux system, your plotting NVMEs and farming HDDs will need to be mounted to a specific location on your computer.
While it may appear intimidating at first, creating partitions and mounting drives is pretty simple, and we are sure you’ll be able to do it yourself after going through this guide.
Choosing a filesystem for your farming drives
Before you can mount a drive, you will need to create a partition. As discussed in part one of this guide, choosing the proper filesystem of your partition is crucial if you want the best results in performance and reliability.
We’ll look at two leading filesystems today: ext4 and NTFS. While both filesystems are viable options for anyone running Linux, there are some differences you must keep in mind before going with any single option.
Choose the NTFS file system only if you want to farm your plots on a Windows or Mac system. This is the only filesystem that supports all three OSes. This is a nice feature, even if you plan to stick with Linux, since Windows is an excellent backup if you run into potential issues.
Unlike plotting, farming will not take a performance hit, so you can choose whichever system is best for you.
Creating Hard Disk Partitions
The next step is creating a partition if you have a new drive. You can skip this step if your drive already has a partition.
A helpful utility for checking drive partitions is Gparted, and you can install it with the command:
sudo apt-get install gparted
After installing, you can launch the application from the launcher and pin it to your favorites for future use.
You can view your drives using the command:
lsblk -fYour terminal output may vary depending on the drives that are mounted. Here is what we had. Notice that the drive with the name sdn does not have any partitions:
NAME        FSTYPE   LABEL   UUID                                 FSAVAIL FSUSE% MOUNTPOINT

sda
├─sda2      ntfs             2C6A7****A7718B2
├─sda3      vfat             EDC8-****                               510M     0% /boot/efi
├─sda4
└─sda5      ext4             832****e-ae91-****-87af-7b4519****80   56.7G    43% /
sdb         ext4     Chia_2  d1ab592b-****-4256-b38f-d90cda884dfb    9.9T    27% /mnt/chia_2
sdn
nvme0n1     btrfs            3d32e696-8079-****-949c-fcac****3891    1.8T     4% /mnt/temp_1
└─nvme0n1p1
nvme1n1     btrfs    raid    4f85863f-9896-****-8aae-e****d037b4c    3.7T     2% /mnt/temp_2
└─nvme1n1p1
nvme2n1     btrfs    raid    4f85863f-9896-****-8aae-e****d037b4c
└─nvme2n1p1
Our drive is now located at /dev/sdX (sdn in this example). Inspecting the drive in GParted:
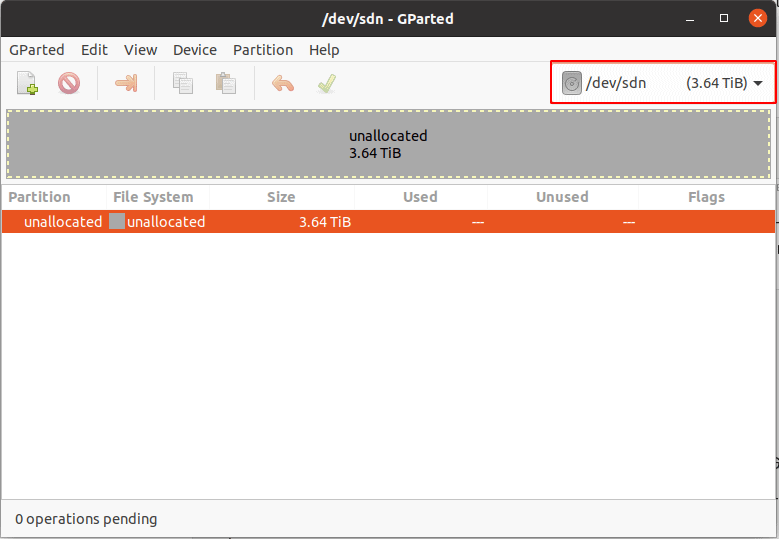
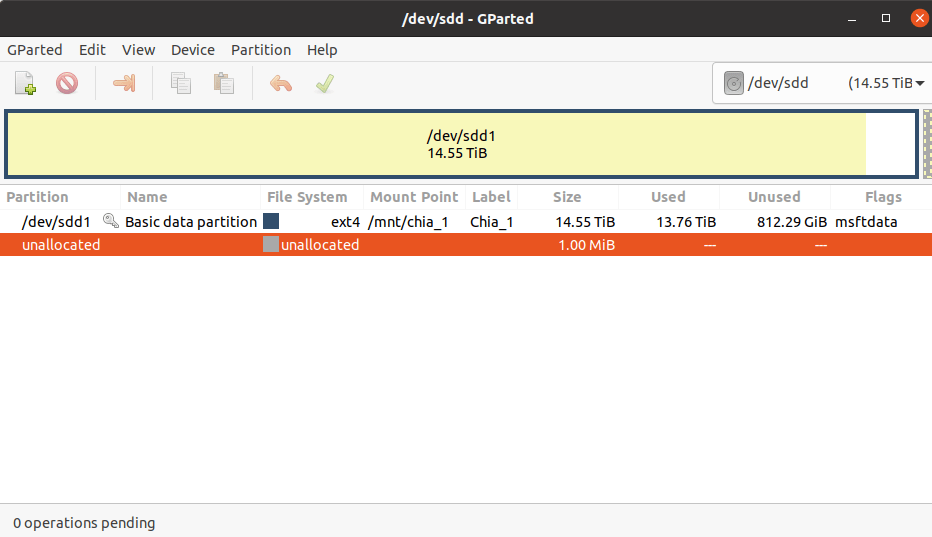
We see no partitions have been allocated. You can check different drives by clicking on the box at the top right and choosing a drive. A hard disk with partitions will appear like this:
To create an NTFS partition, we need to use GParted to create a new partition. Right-click and select the New option. You will now be greeted with the window:
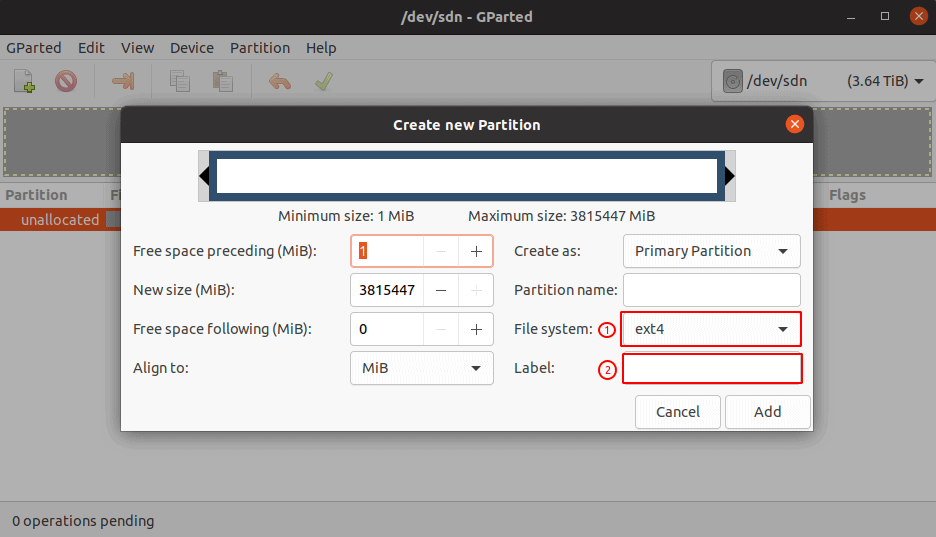
Select the file system drop-down and choose ntfs as the option. Add a label Chia_n to identify your drive across operating systems better. Name the partition the same. Your final screen should look like this:
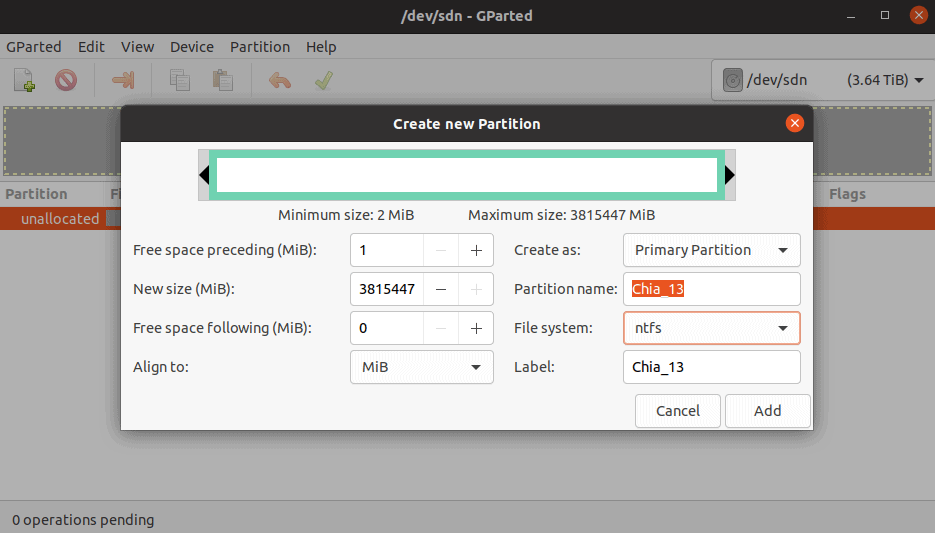
Now click Add. GParted will not apply the changes till you select the “Apply all Operations” tick mark at the top. Verify and select it.
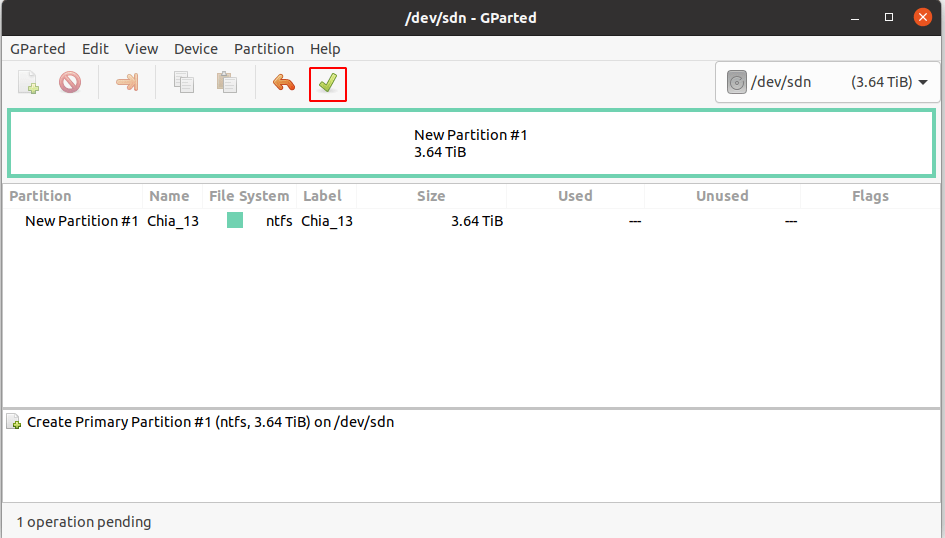
You now have a hard disk partition with the NTFS format. Type up the command:
lsblk -fand you should get the following data for your freshly formatted drive:
NAME    FSTYPE     LABEL   UUID                                 FSAVAIL FSUSE% MOUNTPOINT
sdn
└─sdn1  ntfs-3g   Chia_13  afe7f****-9***-****-9220-****252***ea
As you will notice, the mount point is blank. Linux systems will not automatically mount the drive for you, so you must mount it manually. Grab the UUID from the data above. You will need this for adding to your fstab file.
Create a mount point for your hard disk partition, preferably in the mnt directory:
sudo mkdir /mnt/chia_nMake sure to replace n with your drive number.
Open up the /etc/fstab file using your favorite text editor. We’re using nano:
nano /etc/fstabProceed with caution, as a wrong modification could brick your existing Linux installation! In the last line of the file, add the following entry:
UUID=Your-UUID-here /mnt/chia_n ntfs-3g permissions,defaults 0 2Replace with the appropriate UUID and partition name. Once done, save the file and reboot your system.
You should now be able to identify your new partition. You will also need to give read, write and execute permissions to your plot directory via the command:
sudo chmod 777 /mnt/chia_nYou now have a fresh new drive for storing your plots. Let’s move on to the following step, where we’ll install the Mad Max plotter (optional) and Plotman plot manager.
Step 02: Installing Mad Max and Plotman
Before starting the installation, generating a pool contract address via the plotnft command or through the GUI is necessary to continue. You can skip the next step if you already have the address with you.
Generating the pool contract address for plotting
Starting with Chia 1.2.0, you can generate portable plots to join an official pool to farm Chia. Switching from OG plots to new ones is necessary unless you’re planning on solo farming.
First, make sure to upgrade your Chia CLI and GUI to the latest version:
cd chia-blockchain
. ./activate
chia stop -d all
deactivate
git fetch
git checkout latest
git reset --hard FETCH_HEAD --recurse-submodules

# If you get RELEASE.dev0 then delete the package-lock.json in chia-blockchain-gui and install.sh again

git status

# git status should say "nothing to commit, working tree clean",
# if you have uncommitted changes, RELEASE.dev0 will be reported.

sh install.sh

. ./activate

chia init

# The GUI requires you have Ubuntu Desktop or a similar windowing system installed.
# You can not install and run the GUI as root
cd chia-blockchain-gui
git fetch
cd ..
chmod +x ./install-gui.sh
./install-gui.sh

cd chia-blockchain-gui
npm run electron &
Once done, head over to https://faucet.chia.net/ if your wallet balance is zero so that you have enough Chia to fund the contract.
Make sure your Chia wallet is synced with the blockchain. Make sure that your installation is updated to at least 1.2.0 on all the computers you have installed.
Once synced, run the following command if you want to create a local plot:
chia plotnft create -s local
You can join a pool later by just opening up the GUI and heading to the pool section, where you can add the pool address starting with https://.
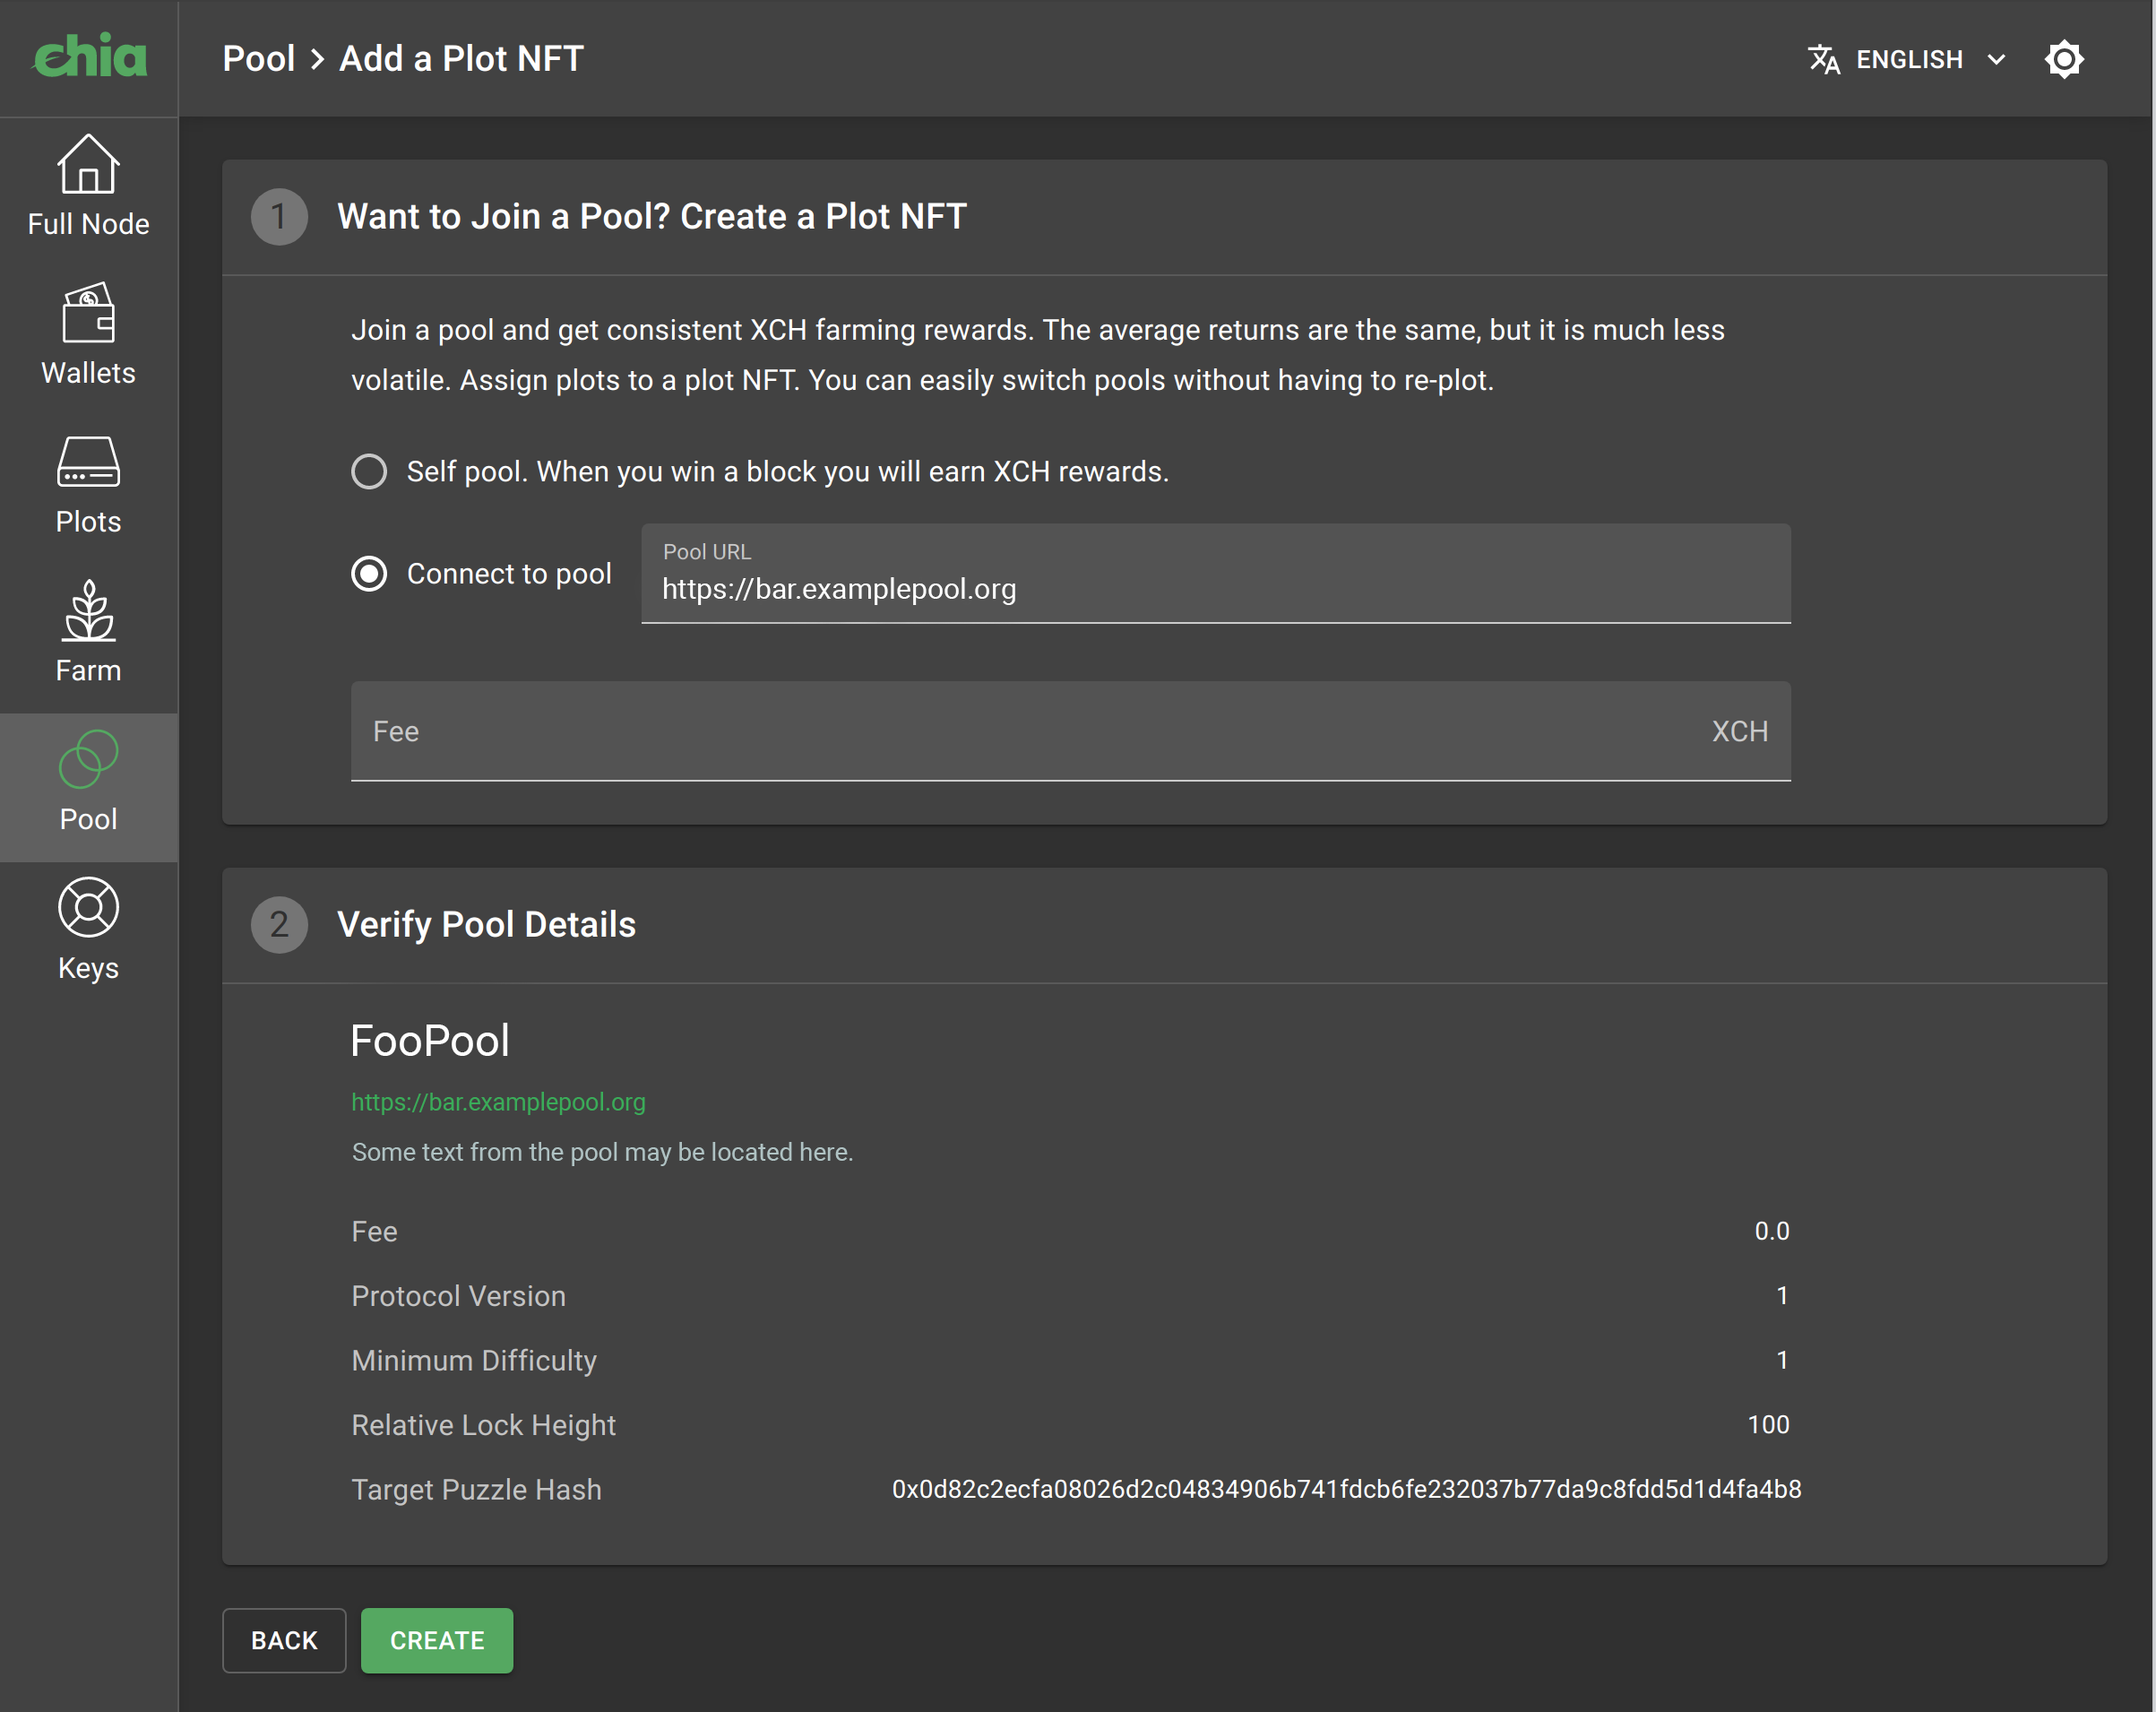
If you have already decided on your pool of choice, then you can run the following command:
chia plotnft create -s pool -u https://bar.examplepool.org
You are now ready to start plotting. Wait till your plot NFT is confirmed on the blockchain and run the command:
chia plotnft showYour pool contract address should begin with xch and be just after the following line:
P2 singleton address (pool contract address for plotting): xch*******You are now ready to install a plotter.
Installing Mad Max (skip if using traditional plotter)
If you read through our article comparing the Mad Mad and standard Chia plotter, you would have narrowed down which is better for your hardware.
If the Mad Max plotter was your choice, or you want to test it out, we have this guide covering the installation process and additional steps like RAID and ramdisk configurations.
Creating an NVMe RAID array or ramdisk
Mad Max performs best when the temporary drive is high-speed storage like a ramdisk or NVMe SSDs in RAID0. Specifications for the temp drive are listed on the Mad Max Github to be 220 GiB for temp1, 110GiB for tmp2, and 256GiB if combined.
The minimum amount of RAM you would need for ramdisk support is 128GB considering you will need some RAM for running the system. In such a case, the other drive will need to be the temp1 drive.
Another option would be to use one SSD for the temp1 and a RAID array of multiple low-capacity NVMes as temp2. In our motherboard buying guide for Chia plotting and farming, you can learn more about the best configurations for each motherboard.
To make a RAID array from your NVMe drives, you need to mount them first. Unlike HDDs, we will use the mkfs command to directly partition and add drives to the RAID array. You can identify a specific NVMe drive and size using the lsblk -f command.
sudo mkfs.btrfs -f -d raid0 -m raid0 /dev/nvme0n1 /dev/nvme2n1 #add more nvmes here
sudo mkdir /mnt/temp_1
sudo mount -t btrfs -o ssd,nodatacow,discard=async,noatime /dev/nvme0n1 /mnt/temp_1
sudo chmod 777 /mnt/temp_1
Make sure to format and mount your temp2 SSD using a similar command:
sudo mkfs.btrfs /dev/nvme3n1
sudo mkdir /mnt/temp_2
sudo mount -t btrfs -o ssd,nodatacow,discard=async,noatime /dev/nvme3n1 /mnt/temp_2
sudo chmod 777 /mnt/temp_2
Or, you could create and mount your ramdisk (min 128GB RAM required) for your temp2 drive:
sudo mkdir /mnt/temp_2
sudo chmod 777 /mnt/temp_2
sudo mount -t tmpfs -o size=110G myramdisk /mnt/temp_2
tmpfs /mnt/temp_2 tmpfs nodev,nosuid,noexec,nodiratime,size=110G 0 0
You’re now done with setting up both the temp drives. We can now move on to installing and setting up the Mad Max plotter.
cd ~
sudo apt install -y libsodium-dev cmake g++ git build-essential
# Checkout the source and install
git clone https://github.com/madMAx43v3r/chia-plotter.git
cd chia-plotter

git submodule update --init
./make_devel.sh
./build/chia_plot --help
Once set up, you can directly start plotting using the command:
./build/chia_plot -n <plot count> -r <threads> -u 128 -t /mnt/temp_1/ -2 /mnt/temp_2/ -d /mnt/chia_n/ -c <pool contract address> -f <farmer public key>You can get the value of the farmer key from the command:
chia keys showYou can head over to Foxypool’s plot planner, where you can add the free space of your hard disk in TB and get the value of n.
If you want more granular control over your plotting or prefer the traditional Chia plotter, then a plot manager like Plotman is your best bet. We’ll cover its installation in the next section.
Installing Plotman
Plotman installation is pretty straightforward, but fine-tuning it, especially with the traditional plotter, can be rather time-consuming to achieve the best plotting performance.
The Plotman Github is pretty comprehensive and a good starting point. The Chia subreddit is an excellent place to start if you need more resources.
cd ~
cd chia-blockchain
. ./activate
pip install --force-reinstall git+https://github.com/ericaltendorf/plotman@main
Plotman’s main configuration options lie in its configuration file, which you can find by:
plotman config pathYou can open and view it in your favorite text editor:
nano /path/to/configOnce complete, you can start plotman using the following:
plotman interactiveThat sums up this extensive guide to setting up your Linux installation with the Mad Max plotter and Plotman. If you found it helpful, please share it so that more people can easily set up their Chia plotters.
If you want to learn more about the latest tech, need buying advice, or want to read more helpful guides, please feel free to bookmark our homepage. If you support us, please send some Chia to xch16e06etrhjnz7ukqe5qtjrzyamwhqs4rle806gqvym0r63lpxz4pqx0dq5u.
Also, contact us if you notice anything missing or incorrect; we’ll be happy to update our article.
Comments
Hello there! If you liked this post, please feel free to share it. Also, do reply below if you have any questions about the process.
discard=async doesn’t work
Could you be more specific in what is not working?